
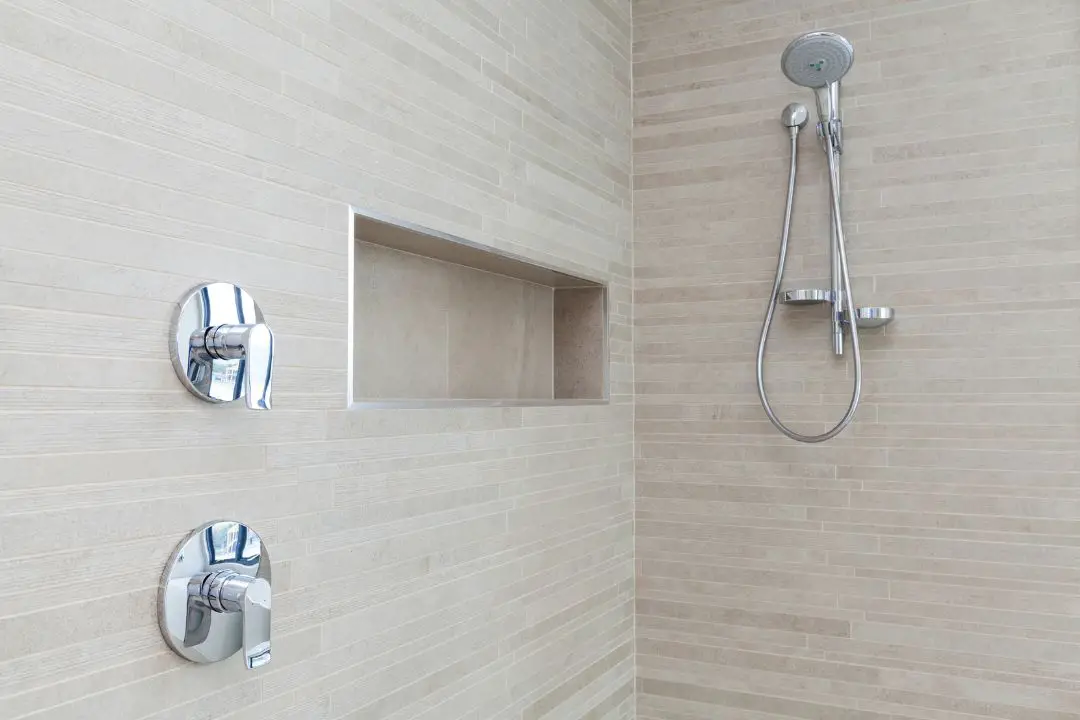
Shower valves are an essential component of any bathroom, controlling the flow and temperature of water to provide a comfortable and relaxing shower experience.
However, when it comes to installation, many homeowners are unsure about the concept of Shower Valve Rough In Depth – the measurement from the finished wall surface to the center of the valve – and how it affects their shower system.
In this article, we’ll take an in-depth look at Shower Valve Rough In Depth, covering everything you need to know about this crucial element of bathroom plumbing.
From understanding why it matters to measuring and adjusting your rough-in-depth for optimal performance, we’ll help you gain confidence in your ability to tackle any shower installation project with ease. So let’s dive in!
Recommended shower valve rough-in depth is usually 1-7 16 inches (37 mm) from the ceiling to a flushed-down toed part of a wall or 2-1 16 inches (56 mm) from a finished toed wall to a finished tiled part of the wall.
What is a Shower Valve Rough In?
A shower valve rough-in is an essential part of the plumbing system that controls the water flow to your showerhead.
It is the initial stage of installing a new shower, and it involves cutting holes in the wall and installing pipes to connect to the main plumbing system.
The purpose of a rough-in valve is to ensure that water pressure and temperature are regulated before it reaches the showerhead.
When installing a new shower system, you need to consider several factors such as size, type of valve, location, and spacing.
You also need to choose between different types of valves such as thermostatic or pressure balancing valves depending on your preferences.
A thermostatic valve provides stable water temperature by sensing changes in water temperature while a pressure-balancing valve maintains constant water pressure despite changes in hot or cold water supply.
Proper installation of a shower valve rough-in ensures efficient functionality and longevity of your bathroom fixtures.
To avoid any future problems with leaks or poor performance when using your shower, it’s important to consult with experienced plumbers who can help you choose the right type of valve for your needs and install it correctly for optimal performance.
Shower Valve Rough-in Depth and The Factors That Determine It:
| Shower Valve Rough-In Depth (Everything You Need To Know!) | Benefits and Stats Info |
|---|---|
| Definition | The rough-in depth refers to the distance between the finished wall surface and the center of the shower valve. |
| Standard Depth | The standard depth for a shower valve rough-in is typically 2 1/2 to 3 inches. |
| Compatibility | It’s important to select a shower valve that is compatible with the rough-in depth of your plumbing system. |
| Measuring | To determine the rough-in depth, measure from the finished wall surface to the center of the valve opening. |
| Adjusting | If the rough-in depth is too shallow or deep, it can be adjusted using a shower valve extension kit or by moving the plumbing. |
| New Construction vs. Remodeling | In new construction, the rough-in depth can be set to the desired measurement. In remodeling, the rough-in depth is often determined by the existing plumbing and may require more extensive changes to adjust. |
| Valve Types | Different types of shower valves have different rough-in depth requirements, so it’s important to choose the right valve for your plumbing system and bathroom design. |
| Trim Kit | The trim kit, which includes the shower handle and other decorative elements, must also be compatible with the shower valve rough-in depth. |
| Professional Installation | For best results, it’s recommended to have a professional plumber install the shower valve and adjust the rough-in depth as needed. |
| Cost | The cost of adjusting the rough-in depth will depend on the extent of the plumbing changes required, and whether an extension kit is needed. |
The depth of a shower valve rough-in is critical in determining the placement and fitting of the shower valve.
This measurement is determined by several factors, including the type of shower fixture being installed, the thickness of the wall materials, and the requirements specified by local building codes.
Type of shower:
One key factor that determines rough-in depth is the type of shower fixture being installed. Different types of fixtures may require different depths to accommodate their unique designs.
For example, if you are installing a thermostatic valve system with multiple controls or diverters, you may need a deeper rough-in depth to support those additional components.
Thickness of your wall materials:
Another crucial consideration when determining rough-in depth is the thickness of your wall materials. The thicker your walls are, the deeper your rough-in should be to ensure proper installation and functionality.
Finally, local building codes can also specify minimum required depths for certain types of shower valves or installations to ensure safety and compliance with industry standards.
Bathroom Tiling:
Bathroom tiling can be an exciting project for many homeowners, but it also comes with a lot of technical details. One of these details is the shower valve rough-in-depth.
The rough-in depth is essentially the measurement from the finished wall surface to where the plumbing for the shower valve will be installed.
This measurement is crucial because it determines how far out your valves or trim kit must protrude from your tiled wall.
The bathroom tiling you choose can significantly impact this measurement, so it’s essential to consider this factor before installing your shower valve.
Larger tiles require less space between them than smaller tiles, which means they can reduce the depth required for your shower valve rough-in.
On the other hand, if you’re planning on creating a more intricate tile pattern that requires smaller tiles, you may need to account for additional space in order to accommodate your shower valves.
Placement of water supply lines:
Another important factor to consider when determining your shower valve rough in depth is the placement of your water supply lines.
Depending on where these lines are located within your walls and how they connect to your plumbing fixtures, you may need to adjust your rough in-depth accordingly.
Ultimately, ensuring that all factors are considered will help guarantee a safe and efficient installation process for your bathroom tiling project.
Bathroom Finish:
The bathroom finish is an essential factor that influences the shower valve rough-in depth. The rough-in depth is the distance between the finished wall and the center of the shower valve.
It is a crucial measurement that determines how your plumbing fixtures will fit in with your bathroom design. A wrong measurement can lead to significant problems, such as leaks and water damage.
Bathroom finishes vary from one type to another, which means they have different thicknesses and textures.
For instance, installing tiles on your bathroom walls adds extra depth to your wall surface, while painting it only adds minimal thickness.
This difference in thickness requires adjustments to the shower valve rough-in depth for a proper installation.
Therefore, when choosing your bathroom finish for a renovation or new construction project, it’s vital to consider how it will affect your shower valve rough-in-depth.
Other Factors:
When it comes to installing a shower valve, one of the most important factors that determine its proper functioning is the rough depth.
This refers to the distance between the finished wall surface and the center of the valve body.
The mixing shower valve type also plays a crucial role in determining this depth as different valves require different depths for installation.
One popular brand that requires specific rough in-depth measurements is Kohler.
Their thermostatic and pressure-balancing valves have unique requirements for proper installation, so it’s essential to carefully follow their instructions before beginning your project.
On the other hand, Moen typically has more flexibility when it comes to rough depths, making them an excellent option if you’re looking for versatility.
When choosing a shower valve and determining its rough in-depth measurement, it’s crucial to consider both your desired features and brand preferences.
Importance of Proper Rough In:
Proper rough-in is crucial to ensure that your shower valve is installed correctly. The rough-in depth of the shower valve must be accurate, or you may face problems when installing the trim kit and handle.
One common problem that occurs due to incorrect rough-in depth is that the handle does not fit properly or sticks out too far from the wall. This not only looks unappealing but also makes it difficult to use.
Furthermore, if the rough-in depth is too shallow, then it could lead to water leaks. If there are gaps between the valve body and the tile, water can easily seep into these gaps and cause damage over time.
On the other hand, if the rough-in depth is too deep, then it could leave a large gap between your finished wall and trim kit which again looks aesthetically unpleasant.
Therefore, taking proper measurements before installing a shower valve is crucial.
How to Rough in Shower Valves?
When it comes to installing a new shower valve, there are a few important things you need to know about roughing in the plumbing.
- First and foremost, you need to make sure that the rough-in depth is correct for your particular valve.
- This measurement will depend on the type of valve you’re using, as well as the thickness of your wall.
- Once you’ve determined your rough-in depth, it’s time to start preparing for installation.
- Begin by marking the location of your valve on the wall with a pencil or marker.
- Then, use a reciprocating saw or hole saw to create an opening in the wall that’s large enough to accommodate both the valve and any necessary plumbing connections.
- With your opening cut and marked, it’s time to begin running pipes and connecting everything together.
- Make sure all pipes are properly secured and sealed before covering everything up with drywall or other finishing materials.
By following these steps carefully, you can ensure that your shower valve installation goes smoothly and without any hiccups along the way.
Ensure Functionality & Aesthetics:
A shower valve rough in depth is an important consideration when it comes to ensuring functionality and aesthetics in your bathroom.
The valve is part of your shower that controls the water flow and temperature, so it’s essential to choose a valve with the right depth for your needs.
If the rough in-depth is too shallow, you may not be able to install a trim kit or handle with enough clearance for comfortable use.
On the other hand, if it’s too deep, you may end up with an unattractive gap between the wall and the trim.
To ensure functionality and aesthetics when choosing a shower valve rough in-depth, you need to consider factors such as the thickness of your wall, the type of tile or paneling used on your wall, as well as any additional features you may want to add later on such as body sprays or rain heads.
Additionally, different types of valves have different requirements for rough-in depths. A thermostatic valve will require more space than a pressure-balancing valve due to its complexity.
Measurements to Consider:
When it comes to shower valve rough in depth, there are a few measurements that need to be considered.
The first is the distance from the finished wall surface to the center of the valve. This measurement will determine where the valve body should be installed during construction.
It’s important to get this measurement right because if it’s too far out or too close in, you may have difficulty attaching any trim pieces later on.
Another important measurement is the distance from the finished floor surface to the center of the valve.
This will determine at what height you’ll need to install your showerhead and other accessories above your tub or shower base.
If this measurement isn’t correct, you could end up with water spraying everywhere except where you want it.
Finally, it’s important to consider any obstructions that may be present behind your wall during installation.
For example, if there are pipes or studs in the way, you’ll need to adjust your measurements accordingly so everything fits properly once installed.
Placement, Depth, & Spacing:
When it comes to installing a shower valve, placement, depth, and spacing are crucial factors that must be considered.
Generally speaking, the rough-in depth for shower valves should be between 2.5 and 3 inches. However, depending on the type of valve you are installing and the thickness of your finished wall material, this measurement can vary.
Placement is also an important factor when roughing in a shower valve. The ideal height for installation is typically around the chest or shoulder level.
This allows for easy access to adjust temperature and flow without requiring users to bend down or reach up awkwardly.
Spacing refers to the distance between multiple fixtures such as valves and spouts. It’s important to ensure adequate space between each fixture so they don’t interfere with one another during use.
In general, a minimum of 8 inches of space should be allowed between different fixtures.
Types of Shower Valves:
The type of shower valve you choose for your bathroom can greatly affect the overall look and functionality of your shower system.
There are several types of shower valves to consider, including pressure balance valves, thermostatic valves, and diverter valves. Each type has its own benefits and drawbacks.
Pressure balance valves:
Pressure balance valves work by balancing hot and cold water to maintain a consistent temperature.
They are typically less expensive than other types of shower valves but may not be as precise in regulating water temperature.
Thermostatic valves:
Thermostatic valves, on the other hand, use a thermostatic element to control water temperature, making them more accurate but also more expensive.
Diverter valves:
Diverter valves allow you to switch between different outlets in your shower system, such as a handheld spray or overhead rain showerhead.
These can be helpful if you want multiple options for how you prefer to take showers or baths.
When selecting a shower valve, it is important to consider the specific needs of your household and talk with a professional plumber about which type would be best suited for your bathroom layout and preferences.
How to Install a Shower Valve Rough-In?
Installing a shower valve rough-in can be a daunting task, but with the right tools and knowledge, it can be done successfully.
- The first step is to determine the location of the rough-in and mark it on the wall.
- Next, you will need to shut off the water supply and remove any existing plumbing fixtures in the area.
- Once you have access to the pipes, you can begin installing the valve by soldering or screwing it into place. It’s important to make sure that all connections are secure and leak-free before proceeding.
- After completing this step, you can then attach any necessary fittings and pipes for your specific shower system.
- Finally, test your installation by turning on the water supply and checking for leaks or issues with water flow. If everything looks good, you’re ready to install your showerhead and finish off your new shower system!
Overall, while installing a shower valve rough-in may take some effort and patience, following these steps will ensure that your plumbing is set up correctly from start to finish.
Thermostatic vs. Pressure-Balancing:
When it comes to shower valves rough in depth, the type of valve you choose can make all the difference. Two popular options are thermostatic and pressure-balancing valves.
Thermostatic valves are designed to maintain a consistent water temperature, regardless of changes in water pressure or flow.
This makes them ideal for households with multiple people using the shower at once, as well as those who want precise control over their shower experience.
Pressure-balancing valves, on the other hand, work by automatically adjusting water flow to maintain consistent pressure.
This ensures that if someone turns on another faucet or appliance while you’re in the shower, you won’t suddenly be blasted with hot or cold water.
While they don’t offer the same level of temperature control as thermostatic valves, they are generally more affordable and easier to install.
Ultimately, which type of valve is right for your bathroom will depend on your individual needs and preferences.
However, it’s important to keep rough in-depth in mind when choosing a valve – if your plumbing doesn’t allow for enough space behind the wall for a particular type of valve, you may need to reconsider your options.
Materials Needed for Installation:
When it comes to installing a shower valve, there are several materials that you will need to ensure the process goes smoothly.
- Firstly, you will need a shower valve rough-in kit, which includes a valve body and cover plate. It is important to ensure that the rough-in kit matches the dimensions of your wall cavity and plumbing connections.
- In addition to the rough-in kit, you will also need copper or PEX piping for the water supply lines, fittings such as elbows and couplings to connect the pipes together, and Teflon tape or pipe dope for sealing threaded connections.
- You may also require a tubing cutter or hacksaw to cut the pipe to length.
- Finally, depending on your specific installation requirements, you may need additional materials such as an adjustable wrench for tightening fittings or a level and measuring tape to ensure proper alignment of the valve body.
Piping, Fittings, & Tools:
When it comes to installing a new shower valve, there are a few key components that you’ll need to have on hand. First and foremost, you’ll need the right piping materials.
Copper tubing is a popular choice for shower installations, as it’s durable and long-lasting. However, PEX tubing has also gained popularity in recent years due to its flexibility and ease of installation.
Once you’ve got your piping sorted out, you’ll need to choose the right fittings to connect everything together.
Compression fittings are commonly used in shower valve rough-ins because they’re easy to work with and provide a secure seal. However, push-to-connect fittings can also be an excellent option if you’re short on time or experience.
Finally, don’t forget about the tools! A pipe cutter will come in handy for cutting your copper or PEX tubing down to size.
You’ll also need wrenches or pliers for tightening your compression or push-to-connect fittings securely. And if you’re using copper piping, a soldering torch will be necessary for joining sections of pipe together with soldered joints.
With these essential components at hand and some basic plumbing knowledge under your belt, your shower valve rough-in should go smoothly from start to finish!
Pros and Cons:
Pros:
One of the key considerations when installing a shower valve is the rough-in depth. This refers to the distance between the finished wall surface and the center of the valve itself.
While there are some benefits to opting for a deeper rough-in, such as providing more space for plumbing connections and allowing for easier installation in certain situations, there are also some drawbacks to consider.
Downside:
One potential downside of a deeper shower valve rough-in depth is that it can lead to reduced water pressure and flow rate due to increased resistance from longer pipe runs.
Additionally, if you plan on installing a trim kit or other decorative components that sit flush against the wall surface, having an excessively deep rough-in may result in those elements appearing sunken or recessed.
Ultimately, determining whether a deeper or shallower shower valve rough-in-depth is right for your project will depend on various factors such as your specific plumbing setup and aesthetic preferences.
Consulting with a professional plumber or contractor can help ensure that you make an informed decision based on all relevant considerations.
Conclusion:
Understanding the shower valve rough-in depth is crucial in ensuring a successful plumbing installation.
The rough-in depth refers to the distance between the finished wall surface and the center of the valve body.
This measurement varies depending on the type of valve used and must be taken into consideration during construction or remodeling.
If the rough-in depth is incorrect, it can lead to several issues such as leaks, poor water pressure, and difficulty in accessing or replacing parts.